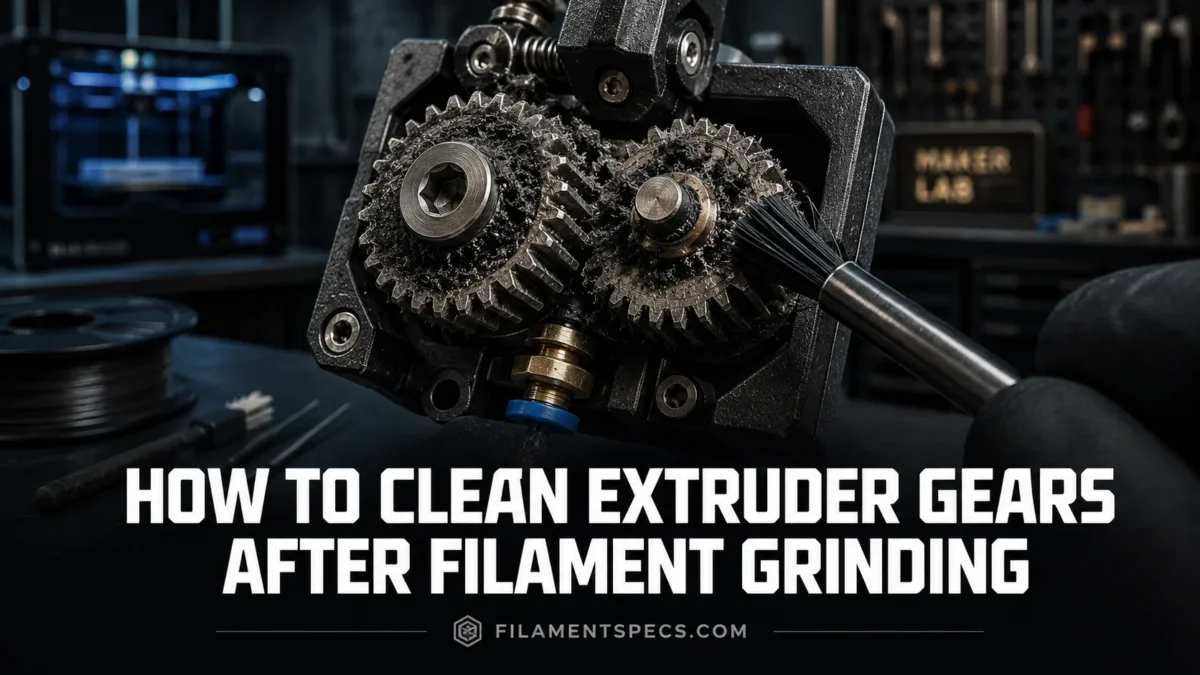
Filament grinding usually starts as a small clicking sound, a weak extrusion line, or a sudden air-print. The drive gear keeps turning, but the filament is no longer moving cleanly. Instead, the gear teeth shave the filament into fine dust and pack that dust into the hobbed grooves. Once those grooves are filled, the gear loses bite. Cleaning the gear is not only about removing visible chips; it is about restoring clean tooth contact, checking the filament path, and finding the reason the filament stopped moving in the first place.
| What You See | Most Likely Area | What to Clean or Check First | Why It Matters |
|---|---|---|---|
| Fine powder around the drive gear | Hobbed gear teeth | Brush the grooves, rotate the gear, blow out dust while protecting the PTFE path | Plastic packed between teeth reduces grip and can cause repeat grinding. |
| Filament has a chewed flat spot | Idler pressure or blocked filament path | Remove the damaged filament section, clean both drive and idler sides, then check tension | A flattened section cannot feed smoothly, even if the gear is clean. |
| Clicking returns after cleaning | Nozzle, heatbreak, PTFE tube, or slicer flow | Check for partial clog, low temperature, too much speed, or too much retraction | Grinding often comes back when the root restriction remains. |
| Dust appears below the gear | Gear housing and filament sensor area | Use tweezers, a small brush, and controlled air bursts | Loose debris can fall into the sensor path or the tube entrance. |
| Gear looks clean but slips | Gear alignment, grub screw, idler bearing | Check that the gear groove lines up with the filament and that the gear is secure | A clean gear still fails if it is not centered on the filament path. |
Table of Contents
⚙️ Why Extruder Gears Grind Filament
Extruder gears are meant to bite into the filament just enough to push it toward the hotend. The problem starts when the filament cannot move at the same rate the motor is trying to feed it. The gear still rotates. The filament stalls. The teeth scrape one spot until a notch forms.
That notch matters because the gear can no longer grab the filament evenly. It starts slipping on the same weakened area, then the small shavings collect inside the gear grooves. Prusa describes filament grinding as a condition where the extruder gears cannot push the filament farther toward the nozzle, so the gears gradually grind away the filament until they cannot grip it anymore.[a]
What Grinding Usually Means
- The gear is not the only suspect. It may be dirty, but the first restriction can be farther down the filament path.
- A partial nozzle clog can make the gear chew the filament even when the extruder itself is clean.
- Too much idler pressure can deform the filament before it reaches the hotend.
- Too little idler pressure can let the gear spin without enough bite.
- High retraction speed, long retraction distance, low temperature, or excessive flow demand can raise pressure in the path.
Common Root Causes Behind the Plastic Dust
Cleaning removes the dust. Diagnosis stops it from coming back. The most common causes are easy to group:
- Flow restriction: clogged nozzle, heat creep, blocked heatbreak, worn PTFE tube, damaged Bowden tube, or a tight filament path.
- Incorrect mechanical pressure: idler screw too tight, idler screw too loose, worn idler bearing, gear misalignment, or a loose drive gear set screw.
- Slicer mismatch: low nozzle temperature, high volumetric flow, high print speed, long retractions, fast retractions, or material profile mismatch.
- Spool resistance: tangled filament, crossed winding, stiff spool holder, too much drag in a dry box, or a sharp tube bend.
- Material behavior: brittle filament, very soft TPU, abrasive-filled filament, dusty filament, or moisture-weakened filament.
Useful distinction: grinding is not the same as normal gear marking. A healthy extruder can leave shallow tooth marks on filament. Grinding means the same area has been shaved, flattened, or cut deeply enough that the gear loses grip.
🔌 Before Cleaning the Extruder Gears
Start with a calm shutdown process. The extruder area may be hot, the gear can move suddenly during unload commands, and small debris can fall into the filament path if the printer is handled roughly.
Stop the Print and Save the Evidence
Cancel the print if extrusion has already stopped. Do not keep pushing filament into a blocked path for minutes. That only makes the ground section longer and packs more dust into the gear.
Before removing anything, look at three things:
- The sound: clicking, squeaking, ticking, or motor skipping.
- The filament: flat spot, notch, chewed groove, swelling, or brittle break.
- The print: under-extrusion, missing layers, weak infill, or a sudden stop in material flow.
This short inspection tells you whether the gear is dirty, the filament is damaged, or the hotend needs attention after cleaning.
Unload the Filament If It Still Moves
If the printer can unload normally, heat the nozzle through the printer menu to the material’s normal unload temperature and unload the filament. Cut away the damaged section before reloading later. A chewed section should not be fed again.
If the filament will not unload, do not yank it cold. Heat the nozzle using the printer’s built-in controls only. Prusa warns against heating the nozzle with an external heat source during procedures that need nozzle heat because it can damage printer parts.[b]
Power Off Before Touching the Gear Area
Once the filament is removed or the stuck piece is safely dealt with, power off the printer and unplug it before putting tools near the extruder gear, idler, sensor, or wiring. The cleaning itself is usually mechanical: brush, pick, tweezers, air, repeat.
Keep debris out of the tube. If the gear sits above a PTFE tube or filament guide, cover the opening while brushing. A cotton swab, clean filament stub, or small temporary plug can stop plastic powder from falling deeper into the printer.
🧰 Tools That Work Without Damaging the Gear
The goal is to clear the hobbed teeth without rounding them, pushing dust into the tube, or contaminating the filament contact surface. Small tools work better than force.
| Tool | Use It For | Good Practice | Avoid |
|---|---|---|---|
| Small brass brush | Cleaning plastic dust from gear grooves | Brush across the teeth, then rotate the gear and repeat | Grinding hard against plastic housing or wiring |
| Wooden toothpick | Picking packed residue from individual grooves | Use the pointed end gently between teeth | Snapping the tip into the gear housing |
| Durable pin or acupuncture needle | Clearing compacted dust from tight hobbed grooves | Use light pressure and work one groove at a time | Scraping aggressively across the gear surface |
| Tweezers | Removing loose strands, chunks, and broken filament pieces | Grip debris only, not sensor flags or delicate cables | Pulling on unknown wires or flex cables |
| Compressed air or blower | Removing loose powder after brushing | Use short bursts and keep the can upright | Blasting debris into the PTFE tube or electronics |
| Cotton swab | Blocking the tube entrance or wiping loose dust | Use dry unless your printer maker allows solvent cleaning | Leaving cotton fibers in the gear path |
For many printers, a small brass brush, toothpick, and controlled air are enough. Prusa lists compressed air, brass brush, toothpick, or a needle-like tool as suitable ways to clear debris from feeding gear grooves on relevant models, and also notes that canned air should not be held upside down near electronics.[c]
What Not to Use
- Do not use oil on the filament-contact teeth.
- Do not spray solvent into an assembled extruder unless the manufacturer says that area is safe for it.
- Do not use a steel wire wheel on small hobbed gears.
- Do not scrape sensor parts, magnets, flex cables, or plastic guide surfaces.
- Do not rotate powered motors by hand while the machine is on.
The teeth need grip. Anything oily on the filament-contact surface can reduce that grip and move into the hotend with the filament.
🧼 How to Clean Extruder Gears After Filament Grinding
This sequence works for most FDM printers, but the access method changes by model. Some printers expose the gear through an idler door. Some need a front cover removed. Some Bowden machines have the feeder mounted away from the hotend. Use your printer’s own service manual for cover removal and cable handling.
1. Remove the Damaged Filament Section
Unload the filament if possible. Cut away any part with a flat spot, bite mark, swelling, or white stress mark. Then cut the end at a clean angle before reloading later. Feeding the damaged section again can jam in the tube or catch at the heatbreak entrance.
2. Open the Idler or Feeder Access
Release the idler tension or open the idler door so the drive gear is visible. On many direct-drive printers, the gear is near the hotend. On Bowden printers, the feeder may be on the frame, rear panel, or side of the machine.
Look for:
- Powder inside the hobbed grooves
- Filament chunks under the gear
- Dust near the filament sensor
- A groove that is not centered on the filament
- A gear that wobbles or shifts on the motor shaft
3. Block the Tube Entrance
If the PTFE tube or filament guide sits directly below the gear, block it before brushing. This is a small step. It saves trouble. Plastic dust pushed into the tube can later act like grit in the filament path.
4. Dry Brush the Gear Teeth
Use a small brass brush or firm brush. Brush the visible teeth until powder lifts out of the grooves. Rotate the gear a few degrees and clean the next section. Repeat until the full circumference has been cleaned.
If the gear cannot rotate freely because the motor holds it, do not force it. Use the printer’s maintenance movement controls only when the printer is assembled and safe to move, or remove the gear according to the manufacturer’s instructions.
5. Pick Packed Grooves One by One
Some dust turns into a hard plug inside the hobbed groove. A brush may skim over it. Use a toothpick or needle-like tool and work gently between the teeth. The motion should lift debris out, not gouge the gear.
Clean both sides of a dual-drive extruder. Dual-drive systems have a powered gear and an idler gear. If only the visible gear is cleaned, the other gear can still carry packed debris and flatten the filament on the next load.
6. Remove Loose Dust
Use tweezers for larger bits. Use short air bursts for powder. Keep air directed away from the tube opening and electronics when possible. If you covered the PTFE entrance, leave it covered until the loose debris is gone.
BCN3D’s cleaning guidance for Bondtech-style extruders notes that compressed air, an air compressor, or a soft brush can be used externally, with disassembly reserved for deeper cleaning when needed.[d]
7. Inspect Gear Alignment and Tightness
A clean gear can still grind if it is misaligned. The hobbed groove should sit on the filament centerline. The filament should travel straight into the tube or hotend entrance. If the gear is mounted to a motor shaft, the set screw should be secure on the flat of the shaft where that design uses one.
Spin the idler gear or bearing by hand if it is accessible and safe. It should rotate freely. A stuck idler can scrape one side of the filament even when the motor gear is clean.
8. Reset Idler Pressure
Idler tension is easy to overlook. Too loose, and the drive gear slips. Too tight, and the teeth crush the filament, raising drag and making soft materials deform. Set it back to the printer maker’s normal position rather than guessing by force.
For flexible filament, the window is narrower. TPU and other flexible materials can buckle, flatten, or twist if the path is not guided well. Use lower pressure than you would with stiff PLA only if your printer’s design supports it.
9. Close the Extruder and Load Fresh Filament
Use a clean filament end. Load slowly. Watch the gear. If the filament enters straight and the extrusion line is even, the gear cleaning worked.
If the gear starts chewing again during loading, stop. The restriction is still present. A clean gear is not meant to push through a blocked hotend.
🔩 Direct-Drive vs Bowden Gear Cleaning
The cleaning idea is the same: remove debris from the drive teeth and restore a smooth filament path. The access points are different.
| Extruder Type | Where the Gear Usually Sits | Extra Area to Inspect | Cleaning Note |
|---|---|---|---|
| Direct drive | On the print head, close to the hotend | Heatbreak entrance, short PTFE guide, filament sensor, toolhead wiring | Be careful with hotend heat and delicate toolhead cables. |
| Bowden | On the frame or rear/side feeder body | Bowden tube, couplers, spool drag, tube bends | Dust may collect in the feeder while the true restriction is inside the tube or nozzle. |
| Dual-drive | Two toothed gears press from both sides | Both gear faces, idler shaft, bearing movement | Clean both gears, not only the powered side. |
| Single-drive with bearing | One toothed gear and one smooth idler bearing | Bearing surface, idler arm, filament channel | Check for a polished flat spot or filament dust around the bearing. |
Bowden Printers Need Tube Checks
A Bowden feeder can look like the problem because the gear is where the dust appears. But the reason for grinding may be farther away: a tight tube curve, worn coupler, swollen filament, or a partial hotend clog. Pull a clean filament strand through the tube by hand with the hotend disconnected where the printer design allows. It should move with steady resistance, not snag.
Direct-Drive Printers Need Heat Awareness
Direct-drive gear cleaning often happens near the hotend. Let the toolhead cool before brushing around plastic parts, wires, and sensor boards. If the nozzle must be heated for unloading or clog clearing, handle that as a separate step before the dry gear cleaning.
✅ What to Check After the Gear Is Clean
After cleaning, the printer should feed a clean filament strand without chewing. The test does not need a full print at first. A controlled load and small extrusion test can tell you a lot.
Run a Short Extrusion Test
- Load fresh filament with the damaged section removed.
- Heat to the normal printing temperature for that filament.
- Extrude a small amount through the printer menu.
- Watch the gear and listen for clicking.
- Check whether the filament exits the nozzle as a steady strand.
The strand should be smooth and continuous. If it curls sharply upward, comes out thin, or stops while the gear clicks, check the nozzle and heatbreak before printing again.
Inspect the Filament After Loading
Unload a short section and look at the tooth marks. Light, even texture is normal. A deep trench on one side suggests alignment or pressure issues. A crushed oval shape points toward too much idler pressure or too much drag.
Check the First Layer Without Forcing Flow
A first layer set too close to the bed can raise nozzle pressure and make the extruder work harder. If grinding starts during the first layer but loading was clean, check bed distance and first-layer flow. A gear cleaning cannot fix a nozzle that is being pressed too close to the build surface.
When Cleaning Is Not Enough
- The gear teeth are rounded, chipped, or visibly worn.
- The set screw will not hold the gear in place.
- The idler bearing does not spin freely.
- The filament sensor keeps reading incorrectly because dust is inside the sensor path.
- The hotend clogs again immediately after fresh filament is loaded.
🧵 How to Reduce Filament Grinding Later
Grinding prevention is mostly about lowering unnecessary resistance. Clean gears help, but the extruder should not have to fight the filament path.
Use Material Profiles That Match the Filament
BCN3D notes that wrong material configuration, hostile retraction settings, low printing temperature, high printing speed, hotend clogs, extruder tension issues, and damaged Bowden tubes can all lead to filament grinding or under-extrusion symptoms.[e]
For daily use, this means:
- Use the correct nozzle temperature range for the filament brand and material.
- Do not push high print speed without checking volumetric flow limits.
- Reduce long or fast retractions if grinding appears during travel-heavy prints.
- Use a slower first test when changing from PLA to PETG, TPU, ABS, ASA, nylon, or filled materials.
- Watch the first few minutes after a nozzle, heatbreak, tube, or gear change.
Keep the Filament Path Smooth
The spool should turn without sharp resistance. Dry boxes, reverse Bowden tubes, filament filters, and spool holders are useful only when they do not add drag. If the extruder can pull filament easily by hand but grinds during printing, the issue may be print settings or hotend flow. If it feels hard to pull even before the extruder, start with the spool path.
Clean After Abrasive or Dusty Materials
Carbon-fiber, glass-filled, glow, wood-filled, and metal-filled filaments can leave more residue around the drive gear than clean PLA. They also demand proper nozzles and tuned flow settings. After a long abrasive print, inspect the gear before starting a long job with soft or flexible filament.
Do Not Over-Lubricate
Some extruder designs need lubricant on certain gear surfaces or bearings. That does not mean the filament teeth should be oily. Prusa’s maintenance notes warn to keep lubricant away from the filament teeth and avoid oil-based lubricant where it may spread into unwanted areas of the filament path.[f]
Clean tooth contact beats extra pressure. If the gear slips, do not simply tighten the idler until the filament is crushed. Clean the gear, reduce path resistance, then set the idler pressure correctly.
🔍 If Grinding Comes Back Right Away
Repeat grinding after cleaning usually means the gear dust was a symptom, not the main fault. Work through the filament path in order.
| Repeat Symptom | Likely Cause | Next Check |
|---|---|---|
| Grinding during loading | Filament cannot enter tube or hotend cleanly | Check filament tip, tube entrance, gear alignment, sensor path, and stuck old filament. |
| Grinding only after several layers | Heat creep, rising nozzle pressure, or material flow mismatch | Check hotend cooling, print temperature, print speed, and partial clog signs. |
| Grinding during retractions | Retraction distance or speed too aggressive | Reduce retraction distance and speed in small steps, then retest. |
| Grinding with flexible filament | Filament buckling, compression, or gap in the path | Lower speed, reduce pressure, check guide support, and avoid sharp bends. |
| Grinding with a new spool | Spool drag, crossed winding, or diameter inconsistency | Unspool a few loops carefully, check movement, and measure filament if needed. |
| Grinding after a nozzle swap | Nozzle not seated correctly or partial blockage | Check nozzle installation, hot-tightening procedure for your printer, and extrusion flow. |
Check for a Clog Before Blaming the Gear
A drive gear can only push so much. If the nozzle or hotend is blocked, the cleanest gear will eventually chew the filament. re:3D lists clogged nozzle, clogged hotend, slicer settings, spool issues, filament filter obstruction, extruder arm tension, and enclosure-related heat effects among possible reasons a drive gear grinds through filament.[g]
Look for Dust in the Sensor Area
Some printers place the filament runout sensor near the gear path. Powder can collect around the sensor channel and cause loading errors or false readings. Use a blower gently and remove visible strands with tweezers. Avoid poking hard into optical, magnetic, or mechanical sensor parts.
Replace Worn Parts When Needed
If the gear teeth are worn smooth, cleaning will not restore bite. If the idler bearing is seized, the gear will keep scraping the filament. If the PTFE tube entrance is deformed, fresh filament can catch and buckle. Replacing a cheap worn guide can solve what looks like an extruder motor problem.
FAQ
Can I Clean Extruder Gears Without Disassembling the Whole Extruder?
Yes, if your printer gives access through an idler door, feeder cover, or side opening. Brush the visible gear teeth, rotate the gear section by section, and remove loose powder with tweezers or air. Full disassembly is only needed when debris is trapped inside the housing, the second gear is hidden, the idler is stuck, or the manufacturer’s service path requires removal.
Should I Use Alcohol to Clean Extruder Gears?
Use alcohol only when your printer or extruder manufacturer allows it for that part, and only where it cannot drip into electronics, bearings, plastic parts, sensors, or the hotend path. For normal grinding dust, dry brushing and air are usually enough. If metal gears are removed from the printer for service, follow the extruder maker’s maintenance instructions for solvent use and drying.
Is a Brass Brush Safe for Drive Gears?
A small brass brush is commonly used because it can lift plastic powder from the gear grooves without being as harsh as harder steel tools. Use light pressure. The aim is to clean the hobbed teeth, not polish them flat.
Why Does My Extruder Still Click After I Clean the Gear?
Clicking after cleaning usually points to resistance somewhere else. Check the nozzle, heatbreak, PTFE tube, first-layer height, print temperature, print speed, retraction settings, spool drag, and idler tension. The gear may be clean but still unable to push filament through a restricted path.
Can Too Much Idler Tension Cause Filament Grinding?
Yes. Too much pressure can crush or deform the filament, especially with soft materials. Too little pressure can also slip. Set the idler according to the printer maker’s recommendation, then tune only in small steps if the printer design allows it.
Do I Need to Replace the Filament After It Has Been Ground?
You do not need to discard the whole spool, but you should cut away the damaged section. A chewed, flattened, or weakened part can catch in the tube, sensor, or hotend entrance. Reload with a cleanly cut end.
How Often Should Extruder Gears Be Cleaned?
There is no universal number for every printer and filament. Clean after any grinding event, after dusty or abrasive filament, and whenever loading becomes unreliable. For printers used often, a visual gear check during routine maintenance is a good habit.
Sources
- [a] Prusa Knowledge Base, “Extruder Noises” — used for the explanation of clicking, filament grinding, gear grip loss, and related causes. Prusa is a 3D printer manufacturer with model-specific support documentation. ↩
- [b] Prusa Knowledge Base, “Clogged Nozzle” — used for safe nozzle-heating context and gear debris cleaning notes. Manufacturer support pages are suitable for maintenance safety guidance. ↩
- [c] Prusa Knowledge Base, “Regular Printer Maintenance (MK3.5/S)” — used for gear-cleaning tools, compressed-air caution, PTFE protection, rotating the gear while brushing, and lubricant placement. Manufacturer maintenance documentation is directly relevant to extruder service. ↩ ↩
- [d] BCN3D Support, “How to Clean the Bondtech Extruder” — used for external cleaning methods such as compressed air, air compressor, and soft brush. BCN3D is a printer manufacturer with official support material. ↩
- [e] BCN3D Support, “How to Fix Filament Grinding” — used for causes such as material configuration, retraction, low temperature, speed, hotend clog, motor thumbscrew adjustment, and Bowden damage. It is official manufacturer troubleshooting content. ↩
- [g] re:3D Support, “Cleaning Extruder Drive Gear after Filament Grinding” — used for the list of common grinding triggers including slicer settings, clogged nozzle or hotend, spool knot, sensor obstruction, extruder arm tension, and enclosure heat. re:3D provides printer support documentation for FFF machines. ↩